When it comes to raising poultry, knowing how to incubate eggs can be an affordable way to expand your flock and potentially generate income by selling chicks or raising rare breeds. While there is an initial investment, the long-term benefits in terms of both time and cost savings make it a wise choice. Discover everything you need to know to decide if you should incubate eggs.

Incubate Eggs vs. Hen Hatching
Our farm specializes in raising rare and heritage breed poultry, and we firmly believe in the power of natural selection. We’ve observed that chicks hatched and raised by their mothers are better birds than those purchased as chicks or hatched in an incubator.
Our preference for mother-raised chicks is grounded in the numerous advantages it offers. When a mother hen hatches and raises her brood, she gives them a vital head start in developing natural immunity, imparts valuable lessons in foraging and survival skills, and teaches them how to interact with their human caregivers. It’s a holistic approach to chick rearing that fosters well-rounded, resilient birds.
If you’re interested in learning more about the benefits of letting broody hens hatch and raise their chicks, we’ve put together a comprehensive article that covers all the ins and outs of this nurturing process. You can read it here.
However, we understand that some people prefer to incubate their eggs, and that’s perfectly fine. Knowing how to incubate eggs properly is essential for those who choose this route. In fact, there are some occasions when we use an incubator ourselves.
Here at our farm, when we want to introduce a new or rare breed and sourcing reasonably priced breeding pairs or chicks becomes a challenge, we employ a budget-friendly solution. We opt to purchase the desired breed’s eggs and hatch them in our incubator. It’s a practical approach that saves us money and allows us to diversify our flock with the breeds we hold dear.
Many dedicated heritage breed enthusiasts opt for incubation over a broody hen. The joy they experience from witnessing the miracle of chicks hatching is undeniable. After all, a mother hen isn’t one to allow humans too close during this magical moment!
If you’re interested in turning your small backyard flock into a profitable venture, we have a valuable resource. Grab your free copy of ‘Profitable Backyard Chickens‘ today and learn how to make the most out of your poultry-raising endeavors.
How To Incubate Eggs
When it comes to incubating eggs, there are various options and considerations to ensure a successful hatch. You can either purchase a ready-made incubator or craft your own. Incubators come in a range of sizes, accommodating as few as a dozen eggs to handling thousands. While making your incubator is possible, it may require some technical know-how.
Now, let’s talk about the eggs themselves. You can use eggs from your own flock, provided they are fertilized, or you can source them from a local farmer or farm supply store. Even if you order eggs, they typically come at a more budget-friendly price than purchasing live chicks.
Expectations for hatch rates usually hover around 70%, though it’s not uncommon to experience a higher success rate. However, unforeseen circumstances can occur, as my friend recently experienced a power failure following a storm. Most incubators rely on electricity, so having a backup power source is a wise precaution.
One crucial step in the incubation process is reading and following the instructions provided with your chosen incubator. While it may not be the most exciting task, it’s essential to familiarize yourself with the specific workings of your incubator, as each model may have unique features.
Before introducing any eggs, it’s universally recommended that you run your incubator for at least three days. This preliminary period allows you to identify and address any potential issues without risking the lives of your precious eggs.
Furthermore, maintaining the correct temperature and humidity levels is paramount to successful incubation. Ensuring that your incubator is calibrated to match the requirements of the eggs you’ve chosen is a crucial step to maximize your hatch rates.
By paying attention to these details and taking the time to set up your incubation environment correctly, you can greatly increase your chances of a successful hatching experience.”

Making Your Own Incubator
Making your own incubator can be rewarding, but it hinges on one critical factor: your ability to maintain a consistent and precise temperature.
When it comes to crafting your DIY incubator, people have employed a range of materials, including cardboard boxes, wood, and even styrofoam. Regardless of the material you choose, there are several features that you should make sure it has.
- The dimensions of your incubator should meet a minimum size requirement of at least 11 inches in height, 11 inches in width, and 16 inches in length.
- Consider installing a see-through top-hinged door on your incubator for easy access and visibility of your eggs and thermometer.
- A word of caution: try to avoid opening the incubator while it’s in use unless absolutely necessary for tasks like egg turning.
- Proper ventilation is key to success. Drill holes at the tops of two sides and the bottoms of the ends to ensure good air circulation.
- To maintain the necessary humidity levels, you can create a simple setup by fastening a wire mesh shelf about 2 inches above the bottom of the incubator. This leaves room for a pan of water to be slid underneath, providing the required humidity.
- Monitoring humidity is crucial; for this, a wet-bulb thermometer is indispensable.
- You can find these at farm supply stores or a hardware store. Many commercially available incubators come equipped with these thermometers.
- One important note for those considering making their own incubator: be prepared to manually turn the eggs regularly and keep records of the turnings.
- Most commercially made incubators will turn them for you, and if you’re industrious enough, you may figure out how to incorporate this into your incubator.
Homemade incubators have average hatch rates of 50% or less because regulating humidity and heat can be challenging. While the success rates vary, some individuals achieve better results than others.
It’s worth mentioning that there are some unconventional and less reliable methods for hatching chicks. Some old-timers have been known to wrap fertilized eggs in cloth and place them in a bucket beside a wood stove, attempting to hatch them.
Others have used light bulbs as a heat source, suspending the bulb directly over a bucket of wrapped eggs. While these methods may have been tried in the past, they generally yield lower hatching rates and lack the precision of modern incubators.

Temperature and Humidity During Incubation
- Universally, a brooding temperature of 99.75 degrees Fahrenheit is the standard for incubating chicken eggs.
- Interestingly, this temperature mirrors the exact conditions under a mother hen, providing a familiar and nurturing environment.
- Maintaining humidity is equally crucial. The optimal humidity for egg incubation can differ based on elevation, geographic location, and distinct breed characteristics.
- While there is ongoing debate among the “experts” about the precise ideal humidity for egg hatching, the consensus is that it should stay within 45% to 60% from the start of incubation until three days before the eggs are due to hatch.
- In the final three days, often called the “lock-down” phase, it’s recommended to raise the humidity to a range of 80 to 90% to facilitate easy hatching.
- It’s essential to house your incubator in a well-ventilated room with temperature control to ensure consistent temperature and humidity.
- Avoid placing it in direct sunlight, near heat sources, or in drafty areas, as these conditions can disrupt incubation.
- Keep a close eye on the temperature; any reading above 103 degrees Fahrenheit can prove fatal to your developing chicks.
- While most incubators are designed to automatically turn the eggs for you, some budget-friendly models may require manual egg-turning.
- Be sure to check your incubator’s features to determine whether it has an automatic egg-turning function.
It may cost more to get one that automatically turns them, but I wouldn’t want to have to remember when it’s time to turn them or to be strapped to monitoring them so closely.
A good incubator will come with everything you need. If you go with a cheaper model that does not have a thermometer or wet-bulb thermometer, you will have to buy them.
Incubate Eggs: Ensuring Correct Placement
Gently place each egg with the pointed end facing down in the incubator’s designated slots or trays. Ensure they are snugly positioned, allowing for proper air circulation. Remember to follow the specific instructions provided with your incubator model, as each may have slight variations in egg placement.
The pointed end of the egg is placed down in the incubator because a fertilized egg begins to develop the embryo at the pointed end, or blunt end as it’s sometimes called. Placing the pointed end down ensures the embryo remains in the proper orientation throughout the incubation process.
This allows the chick to develop with its head facing upward, which is essential for its proper growth and positioning during hatching. Placing the egg with the pointed end down helps mimic the natural incubation conditions provided by a mother hen, where the eggs are typically arranged with the blunt end facing up close to her body.
Turning The Eggs By Hand: Guidelines and Tips
When it comes to turning eggs by hand during incubation, there are some essential practices to follow:
- Start turning your eggs on day 2 of incubation. It’s crucial to mimic the natural behavior of a mother hen, which instinctively turns her eggs.
- Each egg should be turned one-quarter to halfway around at least three times a day. This frequent turning helps reduce the risk of some eggs staying in one position throughout the night while you sleep.
- Consistent turning is vital to prevent improper hatching and deformities during chick development.
- To keep track of which way you last turned each egg, consider placing a mark on them.
- It’s important to use only a pencil or non-toxic material for marking. Eggshells are semi-permeable, and using anything harmful can potentially harm the developing chick.
- Starting on day 10, make any adjustments needed to ensure the egg’s orientation so that the larger end faces straight up or up and to the side.
- This is a crucial step because as the chick grows, its head will develop in the end and be positioned upward. The larger end is the chick’s natural place of development.
- On day 19, it’s time to stop turning the eggs. This mimics the behavior of a mother hen, who stops turning her eggs and begins talking to them in low chattels as she listens for them to peck and chirp.
- Listen closely, as you might even hear the faint peeps and chirps from the developing chicks.
I’ve heard the little cheeps when I’ve checked on my setting hens, and even after 45+ years, I still get excited!

Why Do I Have To Rotate The Eggs?
Someone asked me why you have to place them in a certain position when they’ve seen them in other positions under their hens. That’s a good question. The answer is simple.
Someone asked me why eggs need to be placed in specific positions when using an incubator to incubate eggs, especially since they’ve seen them under their hens in various positions. The answer is actually quite straightforward.
A mother hen possesses a unique ability that we, as caretakers, cannot replicate entirely. She’s a constant presence, tirelessly tending to her eggs by turning and repositioning them underneath her warm feathers. It’s a subtle yet vital part of the incubation process. Just because we might not witness her actions doesn’t mean they aren’t happening.
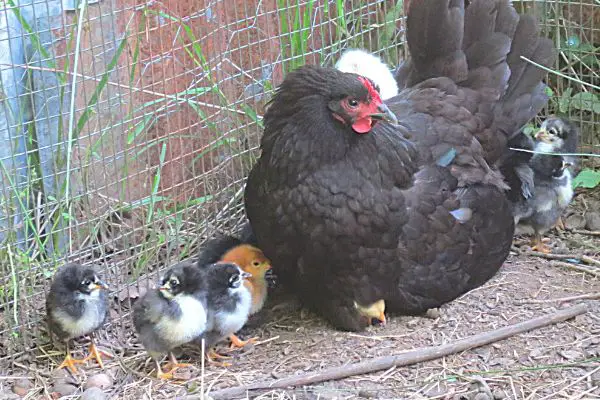
In our experience, one remarkable mother stands out—the Black Australorp hen pictured above; her name was Mammie. Her unwavering dedication to her eggs exemplifies the incredible care and instinctive wisdom hens bring to nurture their offspring. You can learn about Black Australorp chickens in our article.
We had the extraordinary experience of two hens sitting simultaneously, Mammie and a charming Speckled Sussex named Susie. Susie had been diligently tending to her nest for about a week and a half when tragedy struck. She fell victim to a snake bite during one of her brief outings. Returning to her nest, she died during the night. It was a somber discovery the next morning when we found her lifeless on her nest.
With a mix of sadness and hope, we transferred Susie’s chilled eggs to Mammie’s care. We knew it was a long shot but couldn’t help but try. Gently, we added Susie’s precious eggs to Mammie’s clutch, not knowing what to expect.
To our astonishment and joy, Mammie accepted the responsibility and successfully hatched all 24 eggs! It was a heartwarming sight to see her caring for such a large brood. Only one chick encountered a minor issue with its legs, but with a little care, we managed to correct it, leaving it with only a charmingly crooked toe to contend with. It was a remarkable testament to the resilience of nature and the nurturing spirit of our hens.

What to Do When Incubated Eggs Hatch
I know it’s hard, but don’t help the chick out of the shell! It’s understandably tempting to lend a helping hand but resist the urge to assist the chick out of its shell.
Hatching is a natural process that can take several hours, sometimes even up to a couple of days. When a chick finally emerges, it may appear wet and weary. However, this is entirely normal.
Allow the newly hatched chicks the time they need. During this crucial period, they’re busy absorbing the remaining yolk into their bodies, providing them with essential nourishment for the first three days of life. So, while a freshly hatched chick might seem frail or disoriented, rest assured, it’s simply adjusting to its newfound world.
Let nature take its course, and as the hours pass, you’ll witness these once-wet and tired hatchlings transform into fluffy and irresistibly cute bundles of joy.
Once the first chicks have hatched and reached the three-day mark, it’s time to transfer them to their designated brooder. For detailed instructions on this next step, check out our article on brooding chicks.
And if you’re hatching something other than chickens, don’t fret. While the fundamentals remain the same, each incubator typically provides specific directions for incubating various poultry species.
Choosing the Right Incubator: Navigating Options from Low to High-End
Given the multitude of options available today, choosing the perfect incubator can seem daunting. How do you make the right decision?
Start by conducting thorough research, reading reviews, and seeking advice from experienced users. When it comes to incubators, there are four essential features to look for:
- A see-through top for easy visibility.
- Precise temperature control with a clear temperature display.
- Humidity control with a humidity level display.
- Auto-turning of eggs and timer control.
We’ve carefully curated selections in the low-end, mid-range, and high-end price categories to assist you in your decision-making process. We want to simplify your choices and make the decision-making process less daunting.
In our experience, investing more in a mid to high-end model can be worthwhile, as it often results in more reliable and efficient incubation. Ultimately, the choice is yours, and we’re here to help you every step of the way.
Watch TFLs Review of the ChickCozy Incubator
Low End Model
- STABLE TEMPERATURE – Induced airflow system driven by a strong circulating fan for a stable incubator temperature distribution
- DISPLAY HUMIDITY LEVEL – No need to buy an additional hygrometer to monitor incubator humidity level
- BUILT-IN EGG CANDLER – No need to buy additional egg candlers to observe the development of eggs
- EXTERNAL WATER TOP-UP – No need to open the incubator lid to avoid causing temperature fluctuation
- AUTO-STOP EGG TURNER – Automatic stop turning eggs 3 days before hatch to avoid excess turning to eggs
Mid Range Model

- This incubator for hatching eggs can hold up to 22 chicken eggs, 12-18 duck eggs, and 22-24 pheasant eggs
- 360° VISIBILITY: Our egg incubator features 360° viewability, allowing you to monitor eggs from any angle; you’ll have complete visibility of your eggs throughout the incubation process
- 360° INDUCED AIRFLOW: Achieve optimal hatch rates with our egg incubator’s 360° airflow circulation; our Nurture Right Incubator ensures uniform heat distribution and temperature stability for hatching, making this the perfect chicken egg incubator
- HUMIDITY CONTROL: Our user-friendly incubator features an easy-to-read humidity control display and knob; these advanced features are crucial for hatching eggs, where precise humidity is essential for successful hatching
- AUTO TURN & STOP: Effortlessly achieve optimal hatch rates with our chick incubator; equipped with automatic egg turning and a convenient stop feature, egg turning stops three days before hatching, allowing chicks to adjust themselves for ideal hatching
- Clear window with 360° wide view
High End Model
Brinsea Products USAF37C Ovation 28
- Simple and highly accurate digital control system with display of temperature, humidity, and turning status
- Fully automatic control of humidity with integrated humidity pump
- Programmable automatic egg-turning
- 28 chicken egg capacity but suitable for a wide range of egg sizes – large egg carriers available
- Included components: incubator, power cord, hatching mat, egg carriers, humidity block and tubing
Honorable Mention
- This incubator will house 20 Chicken size eggs, 52 Quail, or 10 Goose size eggs in the automatic Egg turner
- Comes with a Universal Egg tray adjustable for just about all sizes of eggs
- 110 Volt with American Plug for the US Market
- Includes a Universal Tray for various sizes of eggs
- Fully Automatic Egg Turning, Temperature, and Humidity Control
Wrap UP
Choosing the right incubator can be overwhelming due to the many options available today. To make an informed decision, conduct research, read reviews, and seek advice from experienced users.
Focus on four key incubator features: a see-through top, precise temperature and humidity control with displays, and auto-turning of eggs with timer control.
We’ve curated selections across the low-end, mid-range, and high-end price ranges to ease the decision-making process. While the choice ultimately depends on your preferences and budget, we’ve found that investing more in a mid to high-end model often yields more reliable and efficient results during incubation.
Remember, the decision is yours, and we’re here to support you every step of the way on your incubation journey.


Leave a Reply