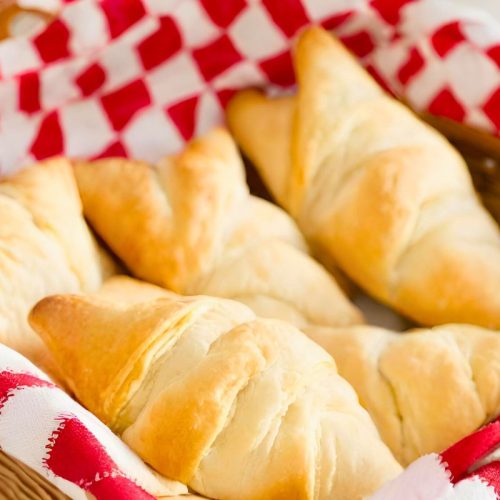
Why do I make homemade hamburger and hot dog buns using this easy, delicious recipe? Because when you remove GMOs and processed foods from your diet, some of the convenience items, like hamburger and hot dog buns, are no longer an option. But considering the many benefits of doing this, making your own becomes a joy. Let’s get baking!

In This Post
I began making homemade buns in 2013 and have perfected this recipe for my family. I like this recipe because it’s so versatile. It can be used for hamburger buns, hot dog buns, rolls, I guess anything you want it to be. All you have to do is decide what you want to make and shape the dough accordingly.
Tips For Making Homemade Hamburger & Hotdog Buns
- In warmer, more humid weather, you’ll need to use a little more flour to absorb the liquid in your recipe.
- This dough will not be stiff like bread dough. It’s supposed to be relaxed, or slack.
- This means you will want to be careful in adding any flour past the 6-cup mark to avoid having heavy buns.
- Just add ¼ cup of flour at a time until your dough is barely kneadable, and only sprinkle enough while kneading to keep it from sticking to your surface and hands.
- When your buns are in the last 20 minutes of the 2nd rising (just before baking), slash the top of the buns or use your fingertips to compress the middles. Since dough rises from the center first, this keeps your buns from mounding in the middle.
- Decide what type of crust you want.
- Crusty top – brush with water before baking.
- Soft top – brush with egg before baking
- Very soft top – brush with butter after baking
- Be patient with yourself. Consistently successful bread baking is a skill that comes with time and experience. You’ll develop your own style and skills as you continue to bake. This recipe is super easy and a good one to start with.
- If you want to make this a sourdough recipe, use 1 cup sourdough starter and 1 ½ cups warm milk as the liquid. Use only 1 package of active dry yeast.
- If you want to use Einkorn Flour, I have started using it exclusively since this post was originally shared, use butter or lard instead of coconut oil and decrease the amount to 1 1/2 Tablespoons. Get my best Einkorn tips for more help.
Hamburger and Hot Dog Bun Recipe
All of my ingredients are Non-GMO and organic. If you don’t use these, no worries, your ingredients will work just fine.
Total Prep Time 3 hours (including 2 hours of rising time). It will get shorter the more familiar you become with the recipe
Equipment you’ll need for this recipe:
- Large Bowl
- Dishtowel to cover your rising dough
- Measuring tools – cups and spoons – these are my favorite
- Kneading board or surface
- Large knife to cut the dough
- Parchment paper
- Baking sheet
- Cooling Rack
Ingredients
- 1 Tablespoon sugar
- 2 Packages active dry yeast (this is about 2 Tablespoons)
- ½ cup warm water (105/F to 115/F)
- 2 Cups warm whole milk (105/F to 115/F)
- 1 Teaspoon raw, organic Apple Cider Vinegar
- 2 Tablespoons coconut oil or butter – in liquid state OR olive oil
- 2 round teaspoons of real salt
- 6 to 7 ½ cups of all-purpose flour


Instructions
- In your large bowl, dissolve the sugar in warm water. Add the yeast and stir well to dissolve.
- Next, add the warm milk, apple cider vinegar, oil, and real salt. Stir to mix thoroughly and to finish dissolving the yeast.
- Now, add 3 cups of the flour to the liquid and beat well for 2 minutes.
- After the 2 minutes, slowly add ½ cup of flour at a time until the dough begins to pull away from the sides of the bowl and begins to make a ball.
- It usually takes 1 ½ – 2 cups to get there.
- Turn the dough out onto your floured kneading surface and knead for about 8 minutes, or just until the dough becomes smooth and elastic.
- Remember: you don’t want to add too much flour to the dough while kneading. Only add enough at a time to keep it from sticking to the kneading surface and your hands.
- Let the dough rest by placing it into an oiled bowl and turn the dough so that the entire dough ball is coated.
- I oil the bowl I mixed the dough in and use it.
- Cover the bowl with a dish towel and let it rise until doubled in size.
- This usually takes at least one hour, depending on the warmth of your kitchen.
- When the ball is doubled in size, turn it out onto a lightly oiled surface and shape it into an evenly dispersed oval.
- These cutting directions will make 18 hot dogs, hamburger buns, or medium-sized rolls, depending on the size of your cuts.
- Using your sharp knife, cut the dough into thirds.
- Then, cut those thirds in half;
- Then those halves into thirds.
- This is the step that determines the size and kind of buns you desire to make.
- You can make the buns bigger by cutting the halved pieces in half instead of in thirds. This will make very large hamburger buns or rolls.
- For hot dog buns, cut them into fourths.
- If I want breakfast buns, I make them smaller than hamburger buns and then use them for toast, breakfast sandwiches, French toast…
- Now that you’ve cut the dough, shape it into the buns you want.
- For hot dog buns, gently roll the dough into a cylinder shape
- For hamburger buns: gently roll the dough into a round shape (this is for rolls as well)
- Place the dough balls on parchment paper-lined baking sheet(s) as you get the dough balls shaped.
- For buns with soft sides, place them ½ inch apart on the baking sheet.
- For crispy-sided buns, place them 2”- 3” apart.
- Press down lightly on the center of each bun to flatten its top. As mentioned in tip four above, this prevents the buns from doing the majority of their rising in the middle, causing a misshapen bun.
- Once you’ve finished shaping all the dough, cover it with a towel and let it rest and rise until doubled in size.
- Preheat the oven to 400 degrees for 15 minutes before you put them in.
- Bake for 20 minutes or until the desired brownness is achieved.
- Remove to a wire cooling rack just until cooled. Use warm or let cool completely for storing.

Homemade Hamburger and Hot Dog Buns
Equipment
- Large bowl
- Dishtowel to cover your rising dough
- Measuring tools – cups and spoons – these are my favorite
- Kneading board or surface
- Large knife to cut the dough
Ingredients
- 1 Tbs sugar
- 2 Tbs (2 Packages) active dry yeast
- ½ cup warm water (105/F to 115/F)
- 2 cups warm milk (105/F to 115/F)
- 1 tsp raw, organic Apple Cider Vinegar
- 2 Tbs coconut oil or butter – in liquid state OR olive oil
- 2 tsp of Real Salt
- 6 – 7 ½ cups of all-purpose flour
Instructions
- In your large bowl, dissolve the sugar in warm water. Add the yeast and stir well to dissolve.
- Next, add the warm milk, apple cider vinegar, oil, and real salt. Stir to mix thoroughly and to finish dissolving the yeast.
- Now, add 3 cups of the flour to the liquid and beat well for 2 minutes.
- After the 2 minutes, slowly add ½ cup of flour at a time until the dough begins to pull away from the sides of the bowl and begins to make a ball.It usually takes 1 ½ – 2 cups to get there.
- Turn the dough out onto your floured kneading surface and knead for about 8 minutes, or just until the dough becomes smooth and elastic.Remember: you don’t want to add too much flour to the dough while kneading. Only add enough at a time to keep it from sticking to the kneading surface and your hands.
- Let the dough rest by placing it into an oiled bowl and turn the dough so that the entire dough ball is coated.I oil the bowl I mixed the dough in and use it.
- Cover the bowl with a dish towel and let it rise until doubled in size.This usually takes at least one hour, depending on the warmth of your kitchen.
- When the ball is doubled in size, turn it out onto a lightly oiled surface and shape it into an evenly dispersed oval.These cutting directions will make 18 hot dog, hamburger buns, or medium size rolls depending on the size of your cuts.
- Using your sharp knife, cut the dough into thirds.
- Then, cut those thirds in half;
- Then those halves into thirds. This is the step that determines the size and kind of buns you are desiring to make.You can make the buns bigger by cutting the halved pieces in half instead of in thirds. This will make very large hamburger buns or rolls.For hot dog buns cut them into fourths.If I want breakfast buns, I make them smaller than hamburger buns and then use them for toast, breakfast sandwiches, french toast…
- Now that you’ve cut the dough, shape them into the buns you want.For hot dog buns: gently roll the dough into a cylinder shape.For hamburger buns: gently roll the dough into a round shape (this is for rolls as well).
- As you get the dough balls shaped, place them on parchment paper lined baking sheet(s).For buns with soft sides, place them ½ inch apart on the baking sheet.For crispy-sided buns, place them 2”- 3” apart.Press down lightly on the center of each bun to flatten its top. As mentioned in tip 4 above, this prevents the buns from doing the majority of their rising in the middle, causing a misshapen bun.
- Once you’ve finished shaping all the dough, cover it with a towel and let them rest, and rise until doubled in size.
- Preheat the oven to 400 degrees 15 minutes before you put them in.
- Bake 20 minutes or until the desired brownness is achieved.
- Remove to a wire cooling rack just until cooled. Use warm or let cool completely for storing.If slicing rolls, allow to cool completely before slicing to avoid crumbly buns.
Notes
- In warmer, more humid weather you’ll need to use a little more flour to absorb the liquid in your recipe.
- This dough will not be stiff like bread dough. It’s supposed to be relaxed, or slack.
- This means you will want to be careful in adding any flour past the 6-cup mark to avoid having heavy buns.
- Just add ¼ cup of flour at a time until your dough is barely kneadable and only sprinkle enough while kneading to keep it from sticking to your surface and hands.
- When your buns are in the last 20 minutes of the 2nd rising (just before baking), slash the top of the buns or use your fingertips to compress the middles. Since dough rises from the center first, this keeps your buns from mounding in the middle.
- Decide what type of crust you want.
- Crusty top – brush with water before baking.
- Soft top – brush with egg before baking
- Very soft top – brush with butter after baking
- Be patient with yourself. Consistently successful bread baking is a skill that comes with time and experience. You’ll develop your own style and skills as you continue to bake. This recipe is super easy and a good one to start with.
- If you want to make this a sourdough recipe, use 1 cup sourdough starter and 1 ½ cups warm milk as the liquid. Use only 1 package of active dry yeast.
- If you want to use Einkorn Flour, I have started using it exclusively since this post was originally shared, use butter or lard instead of coconut oil and decrease the amount to 1 1/2 Tablespoons. Get my best Einkorn tips for more help.
Nutrition
Wrap Up
So not you see how easy it is to have healthy, homemade buns for every occasion.
Remember to check the tips above for the best results.
You may also enjoy more from scratch recipes.
More bread recipes.
Looking for Einkorn Recipes?
As always we’re here to help.


Can I use my bread maker to get it to dough stage? I’m not good at kneading dough. Tried for years, so anything I bake starts out in my bread machine
Yes. A lot of people use their bread maker to get to that stage for the very same reason.
[…] Homemade Hamburger and Hot Dog Buns […]
Can’t wait to try this recipe!
Thanks for sharing this with us on the Homestead Blog Hop!
Thanks Lindsey for stopping by. I hope you enjoy it as much as we do!
[…] Also I would like to say thank you to Rhonda for sharing her wonderful homemade hamburger and hot dog buns recipe! […]
It’s always my privilege to be a part of Trayer Wilderness! Thank you for letting me participate 🙂
These look so good! I’m going to try to make these very soon! Do they freeze well?
Angi, Thanks for stopping by. You will be thrilled with these. Yes M’am, they freeze well. I have frozen them two ways. I’ve placed them in freezer bags lined with parchment paper after I shape them (before the 2nd rising) and I’ve frozen them after I’ve baked them. I really don’t have one way that I prefer them taste and texture wise, but I like to just thaw and eat. You know I’m a simple way girl 🙂 If you freeze them before the 2nd rising just treat them like you would any other yeast dough: Place on pan, let thaw while rising in a warm area, when doubled, bake as usual. Hope your gang enjoys them! Let me know what they think.
Oh I’m going to have to try this recipe. I’m a big fan of buns for soups or sandwiches (not to mention hot dogs and hamburgers) but haven’t found one yet that I’m completely satisfied with. So I’m really looking forward to trying this one. Hopefully my search for the perfect bun recipe is over.
Thanks for sharing.
I hope it turns out to be the answer you’re looking for. Be sure to let me know how they turn out for you. 🙂