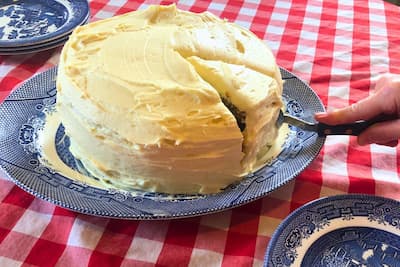
Indulge in the decadent comfort of a homemade, layered old fashioned coconut cake. The nostalgia of its simplicity and decadence instantly transports you to cherished moments—family gatherings, special celebrations, and those Sunday lunches reserved for special company.
There’s a certain magic in the layers of this coconut cake, evoking the warmth of love and making anyone feel special. So, why not whisk up this timeless treat just because? Let the aroma fill your kitchen and the memories unfold with every delightful bite of this old fashioned coconut cake.

In This Post
Old Fashioned Coconut Cake Recipe From My Great-Grandmother
My Granny’s old fashioned coconut cake was a staple at Christmas and Easter, and she never hesitated to whip one up for any “special” occasion. I am often asked, “I follow my grandmother’s recipe exactly, but it doesn’t taste the same. What am I doing wrong?”
The key lies in the quality of ingredients. You see, “Once upon a time,” all food was organic, non-GMO, and free from pesticides and other poisons. When I made the switch to organic, non-GMO ingredients, the flavors took me back to the kitchen of my childhood.
It was a bit of a “Duh” moment. I realized that my great-grandmother and grandmother didn’t have to deal with GMOs, pesticide-laden, heavily processed ingredients. While not everyone can have a cow for fresh milk and butter or chickens for fresh eggs, opting for organic, non-GMO, and/or grass-fed ingredients brings you as close as possible without producing your own.
This coconut cake recipe, passed down from my great-grandmother, Ma Horton, to my grandmother and then to me, is a cherished family treasure. It’s a reminder of simpler times and the joy that comes from using wholesome, quality ingredients in our baking.

Layered Old Fashioned Coconut Cake Recipe
Makes 3 – 8″ cake layers
Ingredients for Cake Batter
- 1 cup butter, softened
- 1 3/4 cup sugar
- 2 1/8 teaspoons baking powder
- 1 teaspoon salt
- 2 teaspoons vanilla (I often use 1 Tbs because we like vanilla)
- 3 eggs
- 2 1/4 cups all-purpose flour
- 1 1/4 cup milk
Ingredients for Fluffy White Frosting
- 1 1/3 cups sugar
- 12 Tablespoons of light corn syrup
- 4 egg whites beaten
- 3 teaspoons vanilla
- 6 Tablespoons water
- 16 oz of unsweetened coconut. I use 20 oz because we like coconut
Instructions For the Cake
- Line three 8″ cake pans with parchment paper. OR lightly oil and flour the bottom and sides of your cake pans.
- Preheat oven to 350 degrees F.
- Combine flour, real salt, and baking powder in a medium-sized bowl and set aside.
- Using an electric mixer (my favorite mixer), cream the butter.
- Add sugar and mix well.
- Add the eggs one at a time and combine well after each addition.
- Alternate adding the flour mixture and milk to the mixing bowl until both are completely incorporated.
- Add vanilla and beat on medium speed for 2 minutes.
- Evenly divide the batter between the prepared cake pans and bake for 20-25 minutes, until the cake springs back when lightly touched in the middle and the cake is golden.
- Cool cakes in the pan for 5 minutes on a cooling rack.
- Then remove the cakes from the pans and allow them to cool on the rack until completely cooled.


Instructions for the Frosting
- Combine sugar, corn syrup, and water in a heavy saucepan.
- Cover and bring to a rolling boil over medium heat.
- Remove the lid and continue boiling for 6-10 minutes. Do Not Stir.
- Check the mixture using a 1-cup glass measuring cup filled with cold water sitting on the counter next to the pot.
- At the 6-minute mark, drop a small amount of the syrup into the cold water. If a firm ball forms, it’s ready. If it drops flat or drizzles to the bottom of the cup, cook for 30 seconds more and check again.
- If you have a candy thermometer, aim for a temperature of 245°F.
- While the mixture is boiling, use the whisk attachment of your mixer to beat the egg whites on high until stiff peaks form.
- Once your syrup is ready, turn your mixer on medium speed and slowly (SLOWLY) stream the hot syrup mixture into the egg whites.
- When all of the syrup is incorporated into the egg whites, add the vanilla.
- Beat on high speed for about 10 minutes or until stiff peaks form.
- Spread a little of the fluffy white frosting on top of the bottom layer and sprinkle with coconut.
- Add the second layer and spread frosting on top of it, and sprinkle with coconut.
- Add the third layer and spread the remaining frosting over the top and sides of the cake, then add coconut.
- Gently press the coconut into the frosting.
- Now, lick the bowl! Your cake is ready to serve.
Tips
- Don’t let the frosting intimidate you. It is a bit tedious, but once you taste it, you’ll say, “It wasn’t that hard!”
- Be careful to stop cooking the frosting when the ball forms in the water
- Don’t worry if you’ve never used this method. It will be obvious when the ball forms and when it doesn’t.
- A ball will form, generally, around the 7-9 minute mark.
- If you get over-anxious, I have, and the frosting is a little runny, just refrigerate the cake after frosting it. When you’re ready to have a piece, cut it and let it sit out for 5 minutes for the frosting to soften.


Old-Fashioned Layered Coconut Cake
Ingredients
Makes 3 – 8"Cake Layers
- 1 cup butter softened
- 1 ¾ cup sugar
- 2 ⅛ teaspoons baking powder
- 1 teaspoon salt
- 2 teaspoon vanilla (I often use 1 Tbs because we like vanilla)
- 3 eggs
- 2 ¼ cup all-purpose flour
- 1 ¼ cup milk
Instructions
For the Cake
- Line three 8" cake pans with parchment paper. OR lightly oil and flour the bottom and sides of your cake pans.
- Preheat oven to 350 degrees F.
- Combine flour, salt, and baking powder in a medium-size bowl and set aside.
- Using your mixer, cream the butter.
- Add sugar and mix well.
- Add the eggs one at a time and combine well after each addition.
- Alternate adding the flour mixture and milk to the mixing bowl until both are completely incorporated.
- Add vanilla and beat on medium speed for 2 minutes.
- Evenly divide the batter between the prepared cake pans and bake for 20-25 minutes, until cake springs back when lightly touched in the middle and the cake is golden.
- Cool cakes in the pans for 5 minutes on a cooling rack.
- Then remove the cakes from the pans and allow to cool on rack until completely cooled.
Instructions for the Frosting
- Combine sugar, corn syrup, and water in a heavy saucepan.
- Cover and bring to a rolling boil over medium heat.
- Remove the lid and continue boiling for 6 – 10 minutes. Do not stir.
- Check the mixture using a 1 cup glass measuring cup filled with cold water sitting on the counter next to the pot.
- At the 6 minute mark, drop a small amount of the syrup into the cold water. If a firm ball forms, it's ready.
- If a firm ball forms, it's ready. If it drops flat or drizzles to the bottom of the cup, cook for 30 seconds more and check again.
- If you have a candy thermometer, you want the temperature to be 245 degrees F.
- While the mixture is boiling, use the whisk attachment of your mixer to beat the egg whites on high until stiff peaks form.
- Once your syrup is ready, turn your mixer on medium speed and slowly (SLOWLY) stream the hot mixture into the egg whites.
- When all of the syrup is incorporated into the egg whites, add the vanilla.
- Beat on high speed for about 10 minutes or until stiff peaks form.
- Spread a little of the fluffy white frosting on top of the bottom layer and sprinkle with coconut.
- Add the second layer and spread frosting on top of it and sprinkle with coconut.
- Add your third layer and spread the remaining frosting over the top and sides of the cake and add coconut.
- Gently press the coconut into the frosting
- Now, lick the bowl! Your cake is ready to serve.
Notes
- Don’t let the frosting scare you. It is a bit tedious, but once you taste it you’ll say, “It wasn’t that hard!”
- Be careful to stop cooking the frosting when the ball forms in the water.
- Don’t worry if you’ve never used this method. It will be obvious when the ball forms and when it doesn’t.
- A ball will form, generally, around the 7-9 minute mark.
- If you get over anxious, I have, and the frosting is a little runny, just refrigerate the cake after frosting it. When you’re ready to have a piece, cut it and let it sit out for 5 minutes for the frosting to soften.
Nutrition

FAQs for Old Fashioned Coconut Cake
Why doesn’t my coconut cake taste like my grandmother’s, despite following her recipe?
The secret often lies in the ingredients. Back in the day, everything was organic, non-GMO, and free from pesticides. Switching to organic, non-GMO ingredients might be the key to recreating that nostalgic flavor.
Can I make this coconut cake with regular ingredients if I don’t have access to organic or non-GMO?
While the choice of ingredients can impact the authentic taste, you can still enjoy a delicious coconut cake. Opt for the best quality available to you, and the essence of the old-fashioned recipe will still shine through.
Can I customize this old-fashioned coconut cake with additional flavors or toppings?
Absolutely! Feel free to experiment with additional flavors. Whether it’s a hint of citrus, a dollop of whipped cream, or a sprinkle of toasted coconut, make it your own while preserving the heart of the old-fashioned recipe.
How do I ensure my coconut cake layers are moist and not dry?
For a moist outcome, steer clear of overbaking your layers. To gauge doneness, perform the toothpick test a few minutes ahead of the suggested time. Insert a toothpick into the center; if it emerges with a few moist crumbs clinging to it, your layers are perfectly done.
Can I make the cake layers ahead of time and freeze them?
Yes, you can! Once the layers are completely cooled, wrap them tightly in plastic wrap, parchment paper, or aluminum foil before placing them in a freezer bag or other airtight container. Thaw them in the refrigerator when you’re ready to assemble the cake.
What’s the best way to frost and assemble the coconut cake layers without making a mess?
Begin by placing a dab of frosting on the cake stand to secure the first layer. Apply an even layer of frosting to the first layer and sprinkle shredded coconut over the frosting, then gently place the next layer on top, repeating the process until all of your layers are frosted.
Can I substitute coconut milk for regular milk in the recipe?
Absolutely! Using coconut milk can enhance the coconut flavor in the cake. Feel free to substitute it for regular milk in equal proportions for a delightful twist.
How long can I store a layered coconut cake, and what’s the best way to preserve its freshness?
For optimal freshness, store the cake in the refrigerator in an airtight container. It will begin losing its freshness around day 4. It will still be good, but not as “fresh”. Ours seldom makes it to day 4 before it’s all gone!
You can help it stay moist by placing a slice of bread beside it in the cake holder. I’ve never had one stay around long enough for it to dry out.
Can I make this old fashioned coconut cake in advance for a special occasion?
Certainly! In fact, allowing the flavors to meld makes it even more delicious. You can make it two days before a special occasion and still have optimum freshness.
You can also bake the layers, let them cool completely, and then wrap them tightly before refrigerating. For the best taste and texture, let them come to room temperature before assembling and frosting the cake on the day of the event.
Wrap UP
In writing this recipe, I find myself reminiscing about the love and tradition of it. This timeless recipe holds a special place in my heart.
In every slice of this Old Fashioned Coconut Cake, there’s a taste of tradition and a connection to the past. From ingredient selection to assembly, this recipe embodies the simple joys of family heritage.
May this coconut cake bring warmth and nostalgia to your gatherings, just as it has for generations in my family. Whether it graces your table during holidays, celebrations, or simply turns an ordinary day into something extraordinary, remember the joy that comes from sharing a slice of tradition.
Well, now you know all my secrets to Ma Horton’s layered Old Fashioned Coconut Cake recipe. I promise you, every dish will be scraped clean from the mixer to the cake plate! Happy baking!
You May Also Enjoy
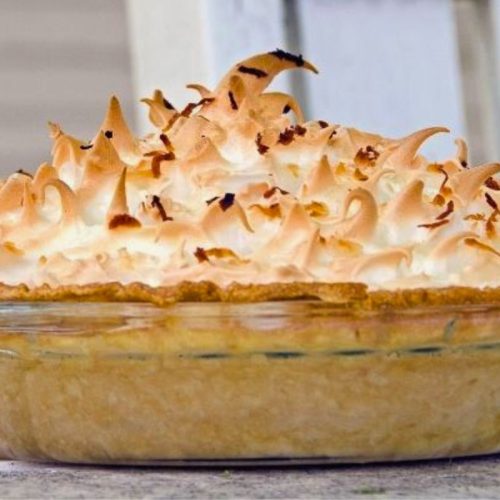
Old Fashioned Coconut Cream Pie

I was nervous about trying a “candy-like” icing; the method of boiling sugars just reminded me of making brittle. At the same time, I was thinking marshmallows. I’m glad my curiosity got the best of me. I too am a coconut generational baker. We have a scratch coconut cake, made only with fresh coconut and old fashioned shortening and confectionery sugar icing. The cake is wonderful, but very time consuming. I did make a few changes to your recipe. i leaned more towards using coconut flavor with a touch of vanilla. I also used almond-vanilla milk, as that is what I had on hand. I replaced corn syrup with simple syrup and agave nectar. I couldn’t wait for a slice of this cake. I was tasting the batter and the frosting all along the way. Also noted, I made this cake into a double layer instead of a triple layer. This recipe turned out great! I’m so thankful you shared your family coconut cake recipe. I have found a new love.
Hi Julie, I’m so glad your curiosity won out! Your changes sound delicious, especially leaning into the coconut flavor. I love hearing from another generational coconut baker, and I’m thrilled the recipe turned out so well as a double layer. Thank you for sharing this with me—it truly blesses my heart!
I would like to Thank You so much for sharing your Family Receipe with everyone. I know how preceious the Special Receipes can be. I absoloutley love Coconut so your receipe will be made. Also nice to finally find a receipe using straight forward ingrediants in the Cake and the Frosting not made on Cream Cheese!
Thanks From Australia
Hi Elaine, your note just warmed my heart so much this cool morning! Thank you for taking the time to share your thoughts and to be a part of this beautiful community of folks at the Farmer’s Lamp. Enjoy your transition into winter down under, Dee
Thank you all for having me !
Well the cake itself is delicious
I had a terrible time with the icy and it was so sticky that my top layer fell apart lol
But the overall taste is great . Also I bought organic coconut but it was dry not moist so I will have to be more careful next time
I plan on making it again but may look at a different icing . But felt great I accomplished what I did and thanks for sharing this great recipe
Thank you, Sue, so much for this sweet and honest feedback. I’m thrilled you loved the cake itself and the flavor overall! That icing can be a bit tricky to work with, so please know you are not alone there. Sometimes it just has a mind of its own. I appreciate you mentioning the coconut too, because the texture can definitely vary depending on the brand. Still, I love that you felt accomplished, because homemade layer cakes are no small thing! Thank you for trying our recipe and sharing your experience. I hope the next one turns out even better for you, whether you use this icing again or experiment with another one. Thanks for being a part of The Farmer’s Lamp community and helping us all learn! with heart, Dee
Does the cake itself come out yellow or white after baking? Thanks for sharing.
It depends on the type of flour, eggs, and butter you use. We use Einkorn Flour, fresh eggs from our free ranged hens, and real grass fed butter all of which add color to the cake batter so mine is darker than white but not a true yellow. Before I started using Einkorn it was only slightly off white from the eggs and butter. I hope this answers your question, if not, please let me know.
Hello, can you substitute the corn syrup for maple syrup ?
No Sara, you cannot substitue for it. It gets thick when cooked and is integral to the frosting. We buy Organic Non-GMO corn syrup. I’ve been told by a couple of people they substituted brown rice syrup and it worked but they had to cook it longer. I don’t have personal experience with this so I won’t recommend it, but at least you have the information. Let me know if I can help further.
Hi , My mother’s younger sister always.made a coconut cake for the holidays. She always used fresh coconut for the cake & icing. The icing was made as you described. My mother also made this icing, which I remember licking the bowl & spoon. YUM!! My mother call it 7 Minute Icing.
You’re right, fresh coconut does take the recipe up a notch. I too use it if I can find decent coconuts which is, sadly, hard to do. I’m glad you have such fond memories of making the cake with your mother, what a treasure. Thank you for sharing with us for being part of TFL Community.
I don’t know if I made my frosting wrong or not. Either way it tastes really good, but the frosting was like a marshmallow consistency.
The frosting is similar to making marshmallow but should still spread easily. If it’s too thick to do that, it was probably over cooked by even a few seconds. It’s kind of tempermental that way. I’m glad the taste is good! We love it. Hope this helps.
This looks delicious! Great post and recipe
I LOVE coconut cake! It’s one of my all-time favorites!
Hi Patrick, Yes, it is the coconut lover’s dream dessert, isn’t it? This recipe is truly decadent. I hope you like Ma Horton’s recipe!
This looks delicious! My great aunt had an infamous coconut cake recipe, and this reminds me of hers.
Thanks, Maggie, for stopping by and letting us hear from you. It is delicious 😉
It sounds great, it wouldn’t last long in this house!!
It is the most decadent, I just can’t think of a more lavish word, thing you will put in your mouth. It doesn’t last long here either and there’s just two of us now! It used to only last one day when the kids were home! Enjoy!
This sounds so good! I love coconut….and icing lol.
Well, Adriana, I have to say that is you love both of those things, you’re gonna LOVE this cake. Let me know how it turns out for you!
I guess those recipes must have been pasted down. My grandmother married a Horton, which is my mom’s maiden name, and she had the same ones. Guess we knew how to eat.
That’s so cool Jeramie! Thanks so much for stopping in to share with me. 🙂
This looks so divine, Rhonda! As soon as we finish our move, I’m treating myself to this. I mean, treating my family to this. Yeah, that’s what I meant. Just an fyi, your Twitter button isn’t linking – not the one for this post, but your general site Twitter button. 🙂
Thanks Tessa! This cake is…oh my, just decadently delightful! I’ll be excited to hear what you think when you taste it. Thanks for the heads up on the Twitter button, I’ll go check it out. Thinking about you as you move.
This looks soooo good! I have two questions though, will it taste the same if I use a 9X13 pan? I’m going to a church function this weekend and I think it will serve better in a single layer. The second question is, can you recommend a non-GMO brand of light corn syrup? Thanks!
Thanks Angi! It is so scrumptious. I don’t know why it wouldn’t taste the same as a sheet cake. The frosting might be a little thick for some people, not for me 🙂 I use Wholesome Sweeteners Organic Light Corn Syrup. They make one with Vanilla in it and I’ve had to use it when I couldn’t get the plain. I just left the vanilla out of the frosting and it worked just fine. They have the Non-GMO Project Verified seal. I bought it because it was what the health food store in Shreveport carries. I’ve always been pleased with it. Hope your cake is a big hit! Please let me know how it turns out for you my friend. Thanks again for the comment and the sharing. 🙂