Creating the perfect flaky homemade pie crust has always been a culinary quest, and I must admit, it was quite a challenge for me as well. Just like you, I’ve explored countless recipes, searching for that elusive combination that results in a tender, mouthwatering pie crust.
But my journey towards the ultimate homemade pie crust took a surprising twist, all thanks to my grandmother’s pie crust with vinegar recipe and a secret ingredient that transformed my pie crusts forever.

In This Post
For me, the struggle with pie crusts began when I decided to eliminate processed foods and GMOs from our home. That meant no more convenience of buying “unroll” pie crusts in a pan. At first, it seemed like I would have to bid farewell to the joys of homemade pies, which was not an option since my family was requesting my old-fashioned chocolate pie.
My kitchen became a testing ground as I embarked on a quest to perfect my pie crust recipe. I must admit that my family had to endure quite a few “trial and error” pies during this period. There were pies with crusts that were too thick, others with crusts that turned out too hard, and some that crumbled under the pressure of a knife. They had to eat around the problem, enjoying only the pie filling in some cases, and struggling to cut the crust in others.
After failing with so many recipes I had found online, I had one of those “duh” moments and returned to my grandmother’s basic pie crust recipe. No matter what I tried, I couldn’t get it flaky like hers.
She was a legendary cook, renowned for her exceptional pies, which always vanished first at family and church gatherings. While her magic touch undoubtedly contributed to her culinary success, I couldn’t help but think that the key to her perfect pie crust might have been the lard she used.
However, the challenge was that my grandmother, like many great home cooks of her time, didn’t rely on written recipes. Her cooking was an art, an improvisation that flowed effortlessly from her hands. When asked for a recipe, she struggled to put it into words because she never thought of what she made as a “recipe.” It was a product of instinct and experience—a trait shared by many skilled home cooks.
Fortunately, I knew that my great-grandmother and grandmother wouldn’t be disappointed by my attempts to adapt their recipe and make it my own. After all, each generation brings its innovations and experiences to the kitchen. And so, I embarked on my journey to create a pie crust that could stand up to my grandmother’s legacy.
The turning point came when I remembered an ingredient I used in my kitchen almost daily: raw, organic apple cider vinegar. This household staple, which has multiple uses beyond the kitchen, completely changed the pie crust recipe.
Why I hadn’t thought of it earlier, I’ll never know. I used it to make buttermilk when we didn’t have fresh buttermilk on hand – the simple addition of 3-4 teaspoons to a cup of fresh milk or store-bought whole milk and allowed to sit 5 minutes makes buttermilk.
With the magic of raw, organic apple cider vinegar, I finally achieved the perfect flaky homemade pie crust. No more thick or hard crusts that crumbled under pressure—just tender, melt-in-your-mouth goodness. Today, I’m excited to share this recipe with you, and I confidently believe it will revolutionize your homemade pie crust just as it did for me.
Now, whether you’re committed to an organic and non-GMO lifestyle or prefer conventional ingredients, rest assured that this recipe is versatile and can be adapted to your preferences. So, let’s dive into the recipe and uncover the secret of creating the perfect flaky homemade pie crust with vinegar.

Easy, Homemade Pie Crust with Vinegar
Ingredients
- 1 1/4 cups unbleached all-purpose flour
- 1/4 teaspoon real salt
- 3 Tablespoons solid coconut oil
- 3 Tablespoons solid unsalted butter
- 1 Teaspoon raw organic apple cider vinegar
- 3 Tablespoons cold water
Instructions

- In a medium bowl, mix flour and salt
- Using a pastry blender, cut in butter and coconut oil until the flour mixture resembles coarse crumbs. If you use a mixer or food processor, be sure not to over-process
- Add the apple cider vinegar and mix thoroughly.
- Now, carefully add the water one tablespoon at a time until a ball of dough forms – you don’t want it to be sticky.
- Set the dough ball in the refrigerator for 15 minutes. This allows the butter to rechill.
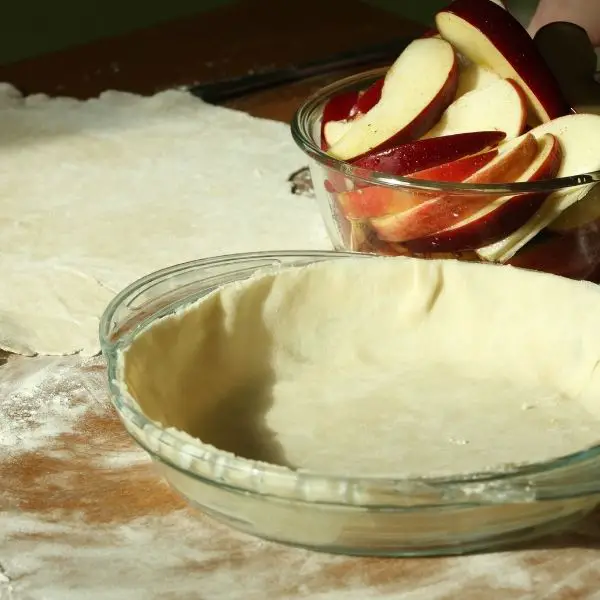
- Using a rolling pin, roll out the dough on a generously floured surface until it’s a few inches larger than your pie plate – 4-5 inches larger is a good goal.
- You may have to flip the crust to re-flour your surface and the crust to prevent it from sticking to the surface and your rolling pin.
- Once you have your pie crust rolled out, lightly flour the top of it and carefully roll it up loosely or fold it into quarters. Then gently lift it and unroll it into your pie plate.
- Gently flute (fold the excess dough under itself) even with the pan. Now you can crimp the edges with your fingers or use a fork to mark the edge.
Single-Crust for Filled Pie
If you want a crust for a pie filling that doesn’t have to be baked, like Ma Horton’s Velvety Chocolate Pie, you’re now ready to bake the crust.
- Heat the oven to 425 degrees.
- While the oven is heating, generously prick the bottom and sides of your crust with a fork (see the last photo above). This will prevent the crust from rising in the middle, causing cracks or peaks and valleys.
- You can also prevent cracks or peaks and valleys by laying a piece of parchment paper on top of your crust and placing baking beads or dry beans on the paper when baking the crust.
- Bake the pie crust for 10 minutes, until your crust is golden brown or to your desired brownness.
Single-Crust for Baked Filled Pie
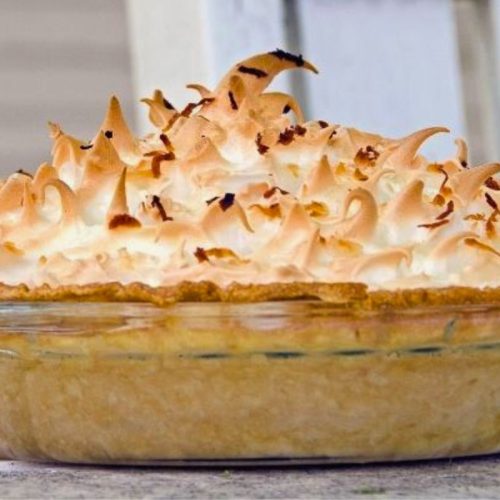
If you want a pie crust for a pie that will be filled and then baked, like Old-Fashioned Coconut Cream Pie,
- Follow steps 1-7, then set the pie crust in the refrigerator while you prepare the filling.
- When the filling is done, remove the pie crust from the fridge and pourit into the pie pan.
- Bake as directed in your recipe.
Double-Crust Pie
For a pie with two crusts, like apple pie, simply double the recipe.
- Follow steps 1-4 above, then,
- Divide the dough in half and roll out each crust as above in steps 5-7.
- Put both crusts in the refrigerator while you prepare the filling.
- When the filling is ready, remove the crusts from the fridge, fill, place the top crust on, and vent.
- Proceed according to your recipe.
Now that you know how to make an easy, homemade pie crust with vinegar, on your mark, get set, Bake!

Easy, Homemade Pie Crust with Vinegar
Ingredients
- 1 ¼ Cups unbleached all-purpose flour
- ¼ tsp real salt
- 3 Tbs solid coconut oil
- 3 Tbs unsalted cold butter
- 1 tsp raw, organic apple cider vinegar
- 3 Tbs cold water
Instructions
- In a medium bowl, mix flour and salt together
- Using a pastry blender, cut in butter and coconut oil until the flour mixture resembles coarse crumbs. If you use a mixer or food processor, be sure not to over process.
- Add the apple cider vinegar and mix in thoroughly. Now carefully add the water 1 tablespoon at a time until a ball of dough forms – you don't want it to be sticky.
- Set the dough ball in the refrigerator for 15 minutes. This allows the butter to rechill.
- Using a rolling pin, roll out the dough on a generously floured surface until it's a few inches larger than your pie plate – 4-5 inches larger is a good goal. You may have to flip the crust to re-flour your surface and the crust to prevent it sticking to the surface and your rolling pin.
- Once you have your pie crust rolled out, lightly flour the top of it and carefully roll it up, loosely, or fold it into quarters. Then gently lift it and unroll it into your pie plate.
- Gently flute (fold the excess dough under itself) even with the pan. Now you can crimp the edges with your fingers or use a fork to mark the edge.
Single Crust for Filled Pie
If you want a crust for a pie filling that doesn't have to be baked, like Ma Horton's Velvety Chocolate Pie, you're now ready to bake the crust.
- Heat the oven to 425 degrees.
- While the oven is heating, prick the bottom and sides of your crust generously with a fork (see the last photo above). This will prevent the crust from rising in the middle, causing cracks or peaks and valleys in your crust.You can also prevent cracks or peaks and valleys by laying a piece of parchment paper on top of your crust and placing baking beads or dry beans on the paper when baking the crust.
- Bake the pie crust for 10 minutes, until your crust is golden brown or to your desired brownness.
Single Crust For Baked Filled Pie
If you want a pie crust for a pie that will be filled and then baked, like Old-Fashioned Coconut Cream Pie,
- Follow steps 1-7 then set the pie crust in the refrigerator while you prepare the filling.
- When the filling is done, remove the pie crust from the fridge and pour it into the pie pan.
- Bake as directed in your recipe.
Double Crust Pie
- For a pie with two crusts, like apple pie, simply double the recipe.
- Follow steps 1-4 above then,
- Divide the dough in half and roll out each crust as above in steps 5-7.
- Put both crusts in the refrigerator while you prepare the filling.
- When the filling is ready, remove the crusts from the fridge, fill, place the top crust on, and vent.
- Proceed according to your recipe.
Nutrition

Wrap Up
In the world of baking, a perfect pie crust is like the crown jewel of homemade desserts. It promises flaky, tender goodness, and in our quest to find the ideal recipe, we’ve explored countless avenues, enduring trials, errors, and a few misadventures along the way. Yet, the secret to achieving that flawless flakiness was hiding in plain sight, right in my cabinet.
Now, our pies, whether sweet or savory, boast a delicate, melt-in-your-mouth crust that elevates the entire culinary experience. Whether you’re dedicated to an organic and non-GMO lifestyle or prefer conventional ingredients, this recipe is versatile and adaptable.
The flaky, homemade pie crust with vinegar is a testament to the notion that good food transcends dietary preferences and brings joy to every palate.
So, as you make your pie crusts, I wish that your pies be flaky, your fillings flavorful, and your memories as sweet as the pies themselves. Here’s to the delight of homemade pies, and the enduring magic of a well-crafted, flaky pie crust with vinegar – a culinary legacy we can all savor and share with our loved ones.
As always, I’m here to help.
You May Also Enjoy
Old Fashioned Chocolate Pie Recipe
Old Fashioned Coconut Cream Pie Recipe


[…] The Easy Flaky Pie Crust You’ve Always Wanted […]
[…] Prepare and bake the pie crust and set it out to cool (My Pie Crust Recipe) […]
Mmmmmm, pie. This looks like a great recipe and sounds pretty similar to my mom’s super secret pie crust recipe, of which I’m not allowed to share on my blog lol. Thanks for sharing on the Homestead Blog Hop!
Thanks Amanda! I’m about to start my Spring juice fast so pie is on my mind 😉 I couldn’t help but laugh at you not being able to share your Mom’s recipe. I haven’t yet decided to share my grandmother’s buttermilk biscuit recipe…just don’t know 🙂 I enjoy your blog hop, thanks for letting me share there.
We’re getting to juice too! We just watched Fat, Sick, and Nearly Dead, so now the hubby is on board too 😀
Getting Ready to juice… it’s too early here lol
Yes, that’s a good one to watch. We do a spring and fall cleanse every year. This will be our fourth year. We’re 80 today and sunny. Rain again tomorrow and 70.